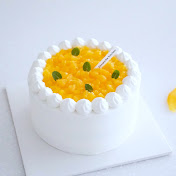
딸기 대신 키위? 루비보다 예쁜 레드 키위 케이크(Ruby Red Kiwi Cake)/Ruby Red Kiwi Fraisier[Eng Sub]
일요부엌
0:00 / 0:00
딸기 대신 키위? 루비보다 예쁜 레드 키위 케이크(Ruby Red Kiwi Cake)/Ruby Red Kiwi Fraisier[Eng Sub]
417 просмотров · 5 месяцев назад
일요부엌
212 подписчиков
417 просмотров · 5 месяцев назад
안녕하세요~ 일요부엌입니다
루비레드키위가 너무 색감이 이뻐서 만들어봤어요ㅎㅎ
케이크는 하루숙성하시면 더 맛있는 상태로 드실 수 있답니다!
아래 공정 핵심 Tip 참고해주세요!
*자막(CC) 설정을 켜시면 상세한 레시피와 팁을 보실 수 있습니다!*
함께해 주셔서 감사합니다! 여러분의 좋아요와 구독은 영상을 만드는 데 정말 큰 힘이 됩니다. ❤️
---------------------------------------------------------------------------------
재료
제누아즈(정사각 1호 높은무스틀 15x15x7)
전란 171g
박력분 102g
설탕 102g
우유 38g
버터 25g
160도 28분~30분(오븐사양에 따라 달리질 수 있습니다)
요거트 크림
생크림 400g
마스카포네 치즈 70g
설탕 40g
요거트가루 63g
키위: 총 데코 3개, 사이드 4개, 인서트 2~3개
--------------------------------------------------------------------------
타임라인
[00:10] 제누아즈 만들기
[03:09] 키위 전처리
[04:57] 시트 슬라이스
[06:21] 크림 만들기
[07:18] 몽타쥬
[12:38] 마무리 장식
[13:46] 틀제거
[14:15] 케이크 커팅
---------------------------------------------------------------------------
[공정 핵심 Tip]
1. 제누아즈 반죽 시 달걀 중탕 온도는 36℃를 꼭 지켜주세요. 설탕이 완전히 녹고 기포가 가장 안정적으로 올라오는 최적의 온도입니다.
2. 휘퍼를 들어 올렸을 때 자국이 5초 이상 유지되는 '리본 상태가 될 때까지 충분히 거품을 내주어야 폭신한 시트가 나옵니다.
3. 키위는 손질 후 키친타월로 수분을 완전히 제거해야 크림이 무너지지 않고 깔끔하게 유지됩니다.
4. 더 정교한 단면을 위해 제누아즈는 1.5cm 2장, 1cm 1장으로 세밀하게 나누어 사용했습니다.
5. 케이크 완성 후 바로 드시기보다 냉장고에서 5시간 이상 숙성해 주세요. 시트와 크림, 과일이 조화롭게 어우러져 훨씬 깊은 맛을 냅니다.
---------------------------------------------------------------------------
일요부엌
이메일: dimanchekit@naver.com
인스타: /dimanche_kitchen
블로그: https://blog.naver.com/dimanchekit
유투브: 일요부엌 /@dimanchekit
-----------‐---------------------------------------------------------------
⚠️ 본 레시피와 영상의 무단 도용, 재편집 및 상업적 이용을 금합니다
본 레시피와 영상의 저작권은 일요부엌에 있습니다
특히 본 레시피를 무단 도용하여 온/오프라인 클래스를 운영하거나, 상업적 목적으로 판매 및 배포하는 경우 저작권법에 따라 법적 책임을 물을 수 있습니다
----------------------------------------------------------------------------
[Recipe] Ruby Red Kiwi Yogurt Cake 🥝✨
Hello, this is Dimanche Kitchen.
I've made a cake using 'Ruby Red Kiwis' today because their vibrant colors are just so stunning!
The cake tastes even better if you let it mature in the refrigerator for a day before serving. This allows the sheet, cream, and fruit to blend perfectly!
Please refer to the Core Baking Tips below
-------‐--------------------------------------------------------------------
🥣 Ingredients
1. Genoise (Square Mold No. 1 / 15x15x7 cm)
A moist and steady base for your cake.
Whole Eggs: 171g
Sugar: 102g
Cake Flour: 102g
Milk: 38g
Unsalted Butter: 25g
Baking: 160°C for 28–30 minutes (This may vary depending on your oven; around 28 minutes is usually perfect for mine!)
2. Yogurt Cream
A refreshing cream with the richness of Mascarpone.
Heavy Cream: 400g
Mascarpone Cheese: 70g
Sugar: 40g
Yogurt Powder: 63g
3. Fruit (Ruby Red Kiwi)
For Decoration: 3 units
For Sides: 4 units
For Insert (Filling): 2–3 units
--------------------------------------------------------------------------
Timeline
[00:10] Making Genoise (Cake Sheet)
[03:09] Preparing Kiwis
[04:57] Slicing the Cake Sheets
[06:21] Making the Cream
[07:18] Assembly (Montage)
[12:38] Final Decoration
[13:46] Removing the Cake Mold
[14:15] Cutting the Cake
-------------------------------------------------------------------------
[Core Baking Tips]
1. When preparing the Genoise, ensure the egg mixture reaches exactly 36°C during the bain-marie. This is the optimal temperature for the sugar to dissolve completely and for the foam to become stable.
2. Whip the batter until it reaches a 'Ribbon Stage' where the trail holds its shape for at least 5 seconds. This is essential for a light and fluffy sheet.
3. After slicing the kiwis, thoroughly remove any moisture with a paper towel. This prevents the cream from collapsing and keeps the cake looking clean.
4. For a more refined cross-section, the Genoise was carefully sliced into two 1.5cm layers and one 1cm layer.
5. Rather than eating it immediately, let the cake mature in the refrigerator for at least 5 hours. This allows the sheet, cream, and fruit to harmonize for a much deeper flavor.
--------------------------------------------------------------------------
💌 Connect with Dimanche Kitchen
Email: dimanchekit@naver.com
Instagram: @dimanche_kitchen
Blog: dimanchekit.naver.com
YouTube: Dimanche Kitchen @dimanchekit
---------------------------------------------------------------------------
⚠️ Copyright & Usage Policy
All rights to this recipe and video belong to Dimanche Kitchen.
Unauthorized copying, re-editing, or commercial use of this content is strictly prohibited.
In particular, legal action may be taken for any unauthorized use of this recipe for online/offline classes, commercial sales, or redistribution without prior consent.
----------------------------------------------------------------------------
